
George Reis's book, Photoshop CS3 for Forensic Professionals, devotes an entire section to this subject, so I won't go into redundant detail. In the example sent to me, the image needed to be adjusted on both the horizontal and vertical axis to start. After the adjustment is performed, using Lens Correction, you can check your work using the Ruler and the Measurement log.
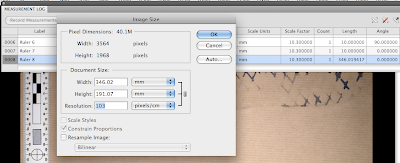
You can then use the results to calibrate your image using the Image Size dialog. Remember to uncheck the Resample Image check box.
Here's the basics of the workflow for this type of image:
- Correct the horizontal with Lens Correction - click OK
- Correct the vertical with Lens Correction - click OK
- Use the Forensic Photoshop Configurator Panel to help correct the image's focus, colour / light, and sharpness.
- Use Ruler / Measurement log to establish scale.
- Verify the horizontal and vertical alignments are within tolerances. Save these to the Measurement log.
- Take the horizontal dimension of the image with the Ruler / Measurement log.
- Calibrate the image (Image Size) with the measurements taken.
No comments:
Post a Comment